Thursday, March 28, 2013

Clock from the Flying Unicorns

Here is a clock I created using the Kaisercraft clock kit. I created my project from all the goodies from the Flying Unicorn store.   Lots of BoBunny and a few other little treasures. 

I used the Bo Bunny Trinkets as my eggs in the nest. 
My birdhouse needs a bird so I used the wonderful new metal adornments from the Flying Unicorn


In this photo, my rooftop is painted with Art Anthology Sorbet in chocolate then coated with Stampendous Frantage Fragments  in Tea Stained color to give a super chunky appearance. 


Stampendous Frantage Fragments - Tea Stained have been used here as well to make them look a little more pinecone-y.    OK not really a word, but it is when you are a scrapper. 

Thanks a million.  Check out the store  at the Flying Unicorns for all kinds of cool and unusual crafting treasures. 

My Supplies:
BoBunny Cest La Vie - Decoupage 13801583/ Viola 13801589/Domino 13801584
Bo Bunny Cest La Vie Trinkets
Manor House Flowers Sublime Mix
Stampendous Frantage Fragments - Tea Stained
Prima FireFly  562782
Kaisercraft Clock
Art Anthology Sorbets - Chocolate
Prima Stamp
Martha Stewart Doily Lace Edge Punch


Wednesday, March 27, 2013

FabScraps Wall Hanging - Little Peeps Collection

Here is a creation I made using the FabScraps Little Peeps collection.  


This wall hanging features the Little Peeps Collection.
I started off with some decorative plates that were on clearance from Thanksgiving.


Here is how the project started.  UGH yeah I know.  But it was cheap in the clearance bin.  I was almost embarrassed buying it even   

I painted all the plates with gesso first


Then I coated all with Mod Podge and white tissue paper.  I wanted great texture. 


Here are my close ups of each plate.   
This plate uses the FabScraps Bedtime Stories Chipboard  DC56 015.  I painted it light yellow and embossed with clear embossing powder just to give it sheen. 

I also made the flowers by using the FabScraps Flower Shape, Center & Tag chippies  (product DC56 016) as  the base  and center of my flower .


You can see the flower chipboard pieces here a little better.

This plate used the FabScraps Fairy Wings chipboard  DC56 006.
I painted it and finished with embossing power ( Stampendous Aged Ivory Embossing Enamel).

I also made my flower from the wonderful Magic Moments C56 005.


Here is a closeup of this plate.  Isn't the fairy adorable? I accented with some fibers and laces. 


Thanks for looking.  I appreciate your time. Check FabScraps out on Facebook and check out their blog.

Here are the FabScraps Papers Used:
Little Peeps Double-Sided Paper 12"X12"
Sweet Pea C56 006
Magic Moments C56 005


Here are the FabScraps Chipboard Pieces Used: Die-Cut Grey Chipboard Word
Bedtime Stories 5.75"X3"  DC56 015
Flower Shape, Center & Tag 12/Pkg   DC56 016
Fairy Wings 2 Sets (4 Wings) To 4"X3.75" DC56 006


Misc Items:
Stampendous Aged Ivory Embossing Enamel
Gesso
Laces and trims

Tuesday, March 26, 2013

Kaisercraft Sat Sketch week 4


Harlequins:
This was created using the Kaisercraft Sat. Sketch #4 and the 75Cent collection by Kaisercraft. LOVE LOVE LOVE This collection.  Such warm richness in the papers. 

Here is the Sat sketch week 4.   This weeks Sketch is based on a Layout called “Cherish” by Sam Hauzer. 


Thanks for spending your time here.  

Kaisercraft Paper Blooms  Honey F628
Kaisercraft 75 Cent Sovereign P1045 ( Background) 
Kaisercraft 75 Cent Farthing P1041 ( Domino papers)
Kaisercraft 75 Cent TUPPence P1044 ( black pieces)
Kaisercraft 75 Cent  Guinea P1047
Kaisercraft 75 Cent  Stickers
Kaisercraft Arty Stamp CS879
Donna Salazar Mixd Media Inx - Verdigris
TIm Holtz Black Soot and Vintage Photo


Souvenir Box - FabScraps Romantic Travel Collection


This is the Romantic Travel Collection.  It's a great new collection from FabScraps. 
I made a souvenir box for all those little tickets and tid-bits collected while on vacation.  
Here are just a few of the items used on this piece. 


FabScraps Romantic Travel Collection -On Vacation Chipboard DC55011
FabScraps Romantic Travel Collection - Stickers - Stamps and Coins ST55001
FabScraps Romantic Travel Collection -Travel Time 2 C55008 ( paper on top of box)
FabScraps Romantic Travel Collection -Travel Large C55005 (bottom borders)

This is the top of my box. I cut the stamp from the words, "On Vacation" and treated them as separate pieces.  


I Stained both pieces with Tim Holtz Vintage Photo Stain.  The stamp was then inked with Tim Holtz Black Soot.  My words were painted with Art Anthology Sorbet in chocolate color.  Sorbets are very thick, heavy glossy type texture paints that add nice definition to your embelishments.  Fun to use. 

My finishing touches on the chipboard is to rub them with Rub N Buff in Gold Leaf. 


I coated the postage stamp with Ranger Rock Candy Clear paint and sprinkled some micro beads while the paint was wet.  

Here is the side view shows my beaded fringe trim.


This is the inside lid.  I used  FabScraps Romantic Travel Collection -Travel Large 2 - C55006 ( inside lid) .  Then you can see I gave it a heavy coat of Rub N Buff. 

The FabScraps Romantic Travel Collection - Stickers - Stamps and Coins ST55001 were fun for me to prepare.    The stamps are transparent so I decided age them a little in keeping with my vintage look.

I stuck them to white cardstock.  The I sprayed a little mist on the back if each and rubbed off the cardstock paper in spots.

I inked the back with Tim Holtz and them sprayed more water to the ink - rubbing some more.
Could I simply have applied ink to the front of the sticker?  Not really because the stickers are plastic and the ink will rub off.  Using the technique that I chose, I could get a nice the rich color.


Thanks so much for looking.  Remember to LIKE FabScraps on Facebook and visit the blog to see what FabScraps has dreamed for us.


Step by Step Instructions
1.     Background Preparation on Box:
2.     Paint  your box as desired.  Ink your edges with brown ink to give an aged appearance.  My box is 6in x6in.
3.     Using your favorite edge punch,  punch strips from FabScraps Romantic Travel Collection – Travel Large C55 005  which will be used for borders on the bottom edges of the box.  Punch one for each side and then glue to box.
4.     Cut a square from the FabScraps Romantic Travel Collection – Travel Time 2 C55 008 .  Ink the edges dark brown if you desire an aged effect and want more definition.
5.     Glue to the top of the box.  I set mine at an angle.  
6.     Cut a square from FabScraps Romantic Travel Collection -Travel Large 2 - C55006  to be glued to inside lid on the box.
7.     Chipboard Preparation:
8.     FabScraps – Grey On Vacation chipboard  DC55 011.  I cut the photo frame from  the words “On Vacation”.  I inked them both with dark brown stain. 
9.     The words “On Vacation” were then lightly dabbed with dimensional paint in a rich chocolate color and set aside to dry.
10.   The photo frame was inked lightly with black ink, painted with a clear gloss paint and topped with a few gold micro beads.
11.   After the photo frame is dry, I glued one of the stickers  from  FabScraps Romantic Travel Stickers Stamps and Coins ST55001 to the back of the chipboard frame.
12.   Glue  both chipboard pieces in place on the top of the box.
13.   Sticker Preparation for sides of box: 
14.   FabScraps Romantic Travel Stickers Stamps and Coins ST55001 – ( these stamps are a little transparent)  I  took the coin  and  stamp  stickers and stuck them onto white cardstock.  Then I took a little water and misted the cardstock on the back of the sticker until a little rubbed off.   My goal was to expose a little bit of the sticker’s backside.
15.   I applied a little brown ink and misted lightly to rub  the ink into the exposed parts of the stamp.    
16.   Glue to the box as desired.
17.  Finishing Touches:
18.   Finish off the piece with jewelry, metal pieces,  beaded trims. 
19.   Using your favorite script stamp, lightly stamp on edges and on the top of the box for accent.  I used a script stamp. 
20.   Rub gold leaf paint or gold leaf wax on edges and top of box.  Dab some  also on the chipboard and on the stickers to create a nice aged romantic effect.
21.   Complete with your choice of flowers and embellishments, skeleton keys, netting, etc.    ENJOY!!!!


Supplies:
FabScraps Romantic Travel Collection -On Vacation Chipboard DC55011
FabScraps Romantic Travel Collection -Travel Time 2 C55008 ( paper on top of box)
FabScraps Romantic Travel Collection - Stickers - Stamps and Coins ST55001
FabScraps Romantic Travel Collection -Travel Large C55005 (bottom borders)
FabScraps Romantic Travel Collection -Travel Large 2 - C55006 ( inside lid)
Tim Holtz Vintage Photo Stain and ink, Black Soot Stain
Ranger Crackle Paint - Clear Rock Candy
Gold Micro Beads
Art Anthology Sorbet Dimensional Gel -Chocolate
Martha Stewart edge punch- Doily Lace
Industrial Chic -pendant jewelry metal
Stampabilities Le LondonScript
Fabric beaded trim
Rub N Buff - Gold leaf
Gesso
Recollections -metal vintage key
Misc paper flowers, floral berries and netting

Monday, March 25, 2013

ZVA Creative March Blog Hop


Zva Creative and my fellow Design Team members welcome you to our March blog hop! We are excited about month's hop and look forward to sharing our new work with you!

Today's Blog Hop begins at Zva Creative's blog! Be sure head on over to check it out! You will also find a complete list of all the participating blogs there (in case there is a glitch along the way).

As you know, Zva offers many beautiful color groupings for pearls, flowers and crystals. If you like what you see along the hop you can find a list of stores and online retailers that sell Zva HERE
.

Mini Album
I created a mini paper bag album.  It was fun for me because I usually do not create mini anythings.   This is the front cover.  

( I have to add that the flowers on this page were made by my friend/scrapper  Maggi Harding who highly encouraged me to try a mini by handing me the blank album with a friendly "here ya go!" She's quite persuasive.  Thanks Maggi.)


ZVA Creative CR-06CA-107 red crystal flourish.  I had to cut it in half because it was too large to fit. 

ZVA Creative CRW-03CB-148 Basic Lines Crystal (0.8cm) (used on the inside of the flower)
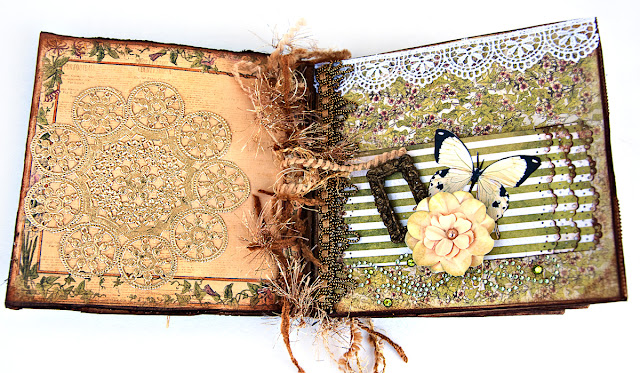
Here is the second page.  The page on the left is a fold out.  

Here is the fold out. 

Here is a view of the  entire foldout pages 1 and 2.

You can see this page features ZVA Creative CR-05CA-131 Flickering - Lime /Olive crystal ( the large flourish).

The smaller flourish was cut and used here on the page below.  More flowers by Maggi Harding.


These are pages 3 and 4.  

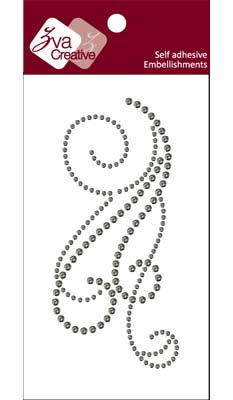
 This is the product used on this page: ZVA Creative CRS-06CA-103 Smoke Flourish
Pages 5 and 6.


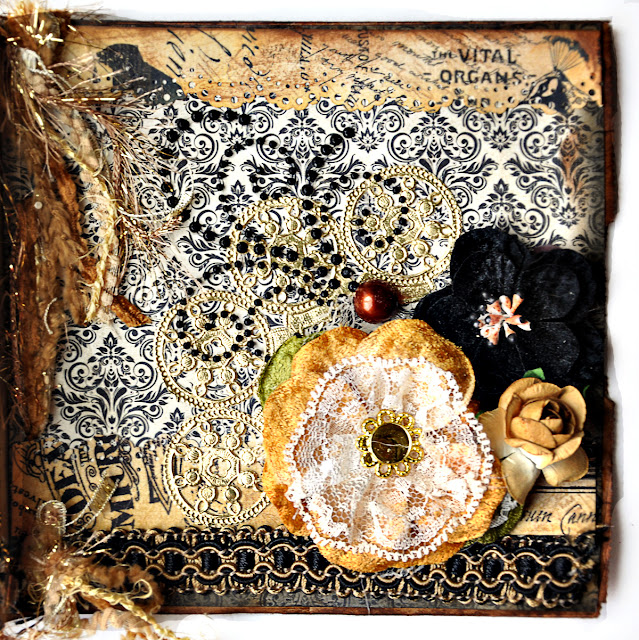
ZVA Creative CRS-06CA-102 Jet Crystal Flourish

Pages 7 and 8


ZVA Creative CRS-06CA-103 Smoke Flourish


ZVA Creative CRW-03CB-148 Basic Lines Crystal (0.8cm)

Pages 9 and 10


ZVA Creative CRX-05CB-122 Flourish Jet Crystal


If you would like to play along with our design team, just follow along the blog path. I am linking to one of the Zva designers and that designer is linking to the next and so on. Be prepared to be inspired along the way!
The Blog Hop starts today, March 25th and runs through midnight US Eastern Standard Time on Tuesday, March 26th.


***Prizes***
Hidden on FIVE of the designer's blogs is a Zva Creative prize package! Winners will be randomly chosen after the hop is over. All you need to do is leave a comment on this Blog Hop post... you do not need to leave a comment on each and every designer's blog post to qualify. However, the more times you comment along the blog hop path, the more chances you will have to win.

The 5 winners will be announced on Wednesday, March 27th on Zva Creative's blog. We will do our best to notify each winner, but it's best if you can pop in to Zva's blog on Wednesday to see if you are a winner!

We also thought it would be more fun to add even more chances to win our blog hop prize! To increase your chances of winning:
* Comment to let us know that you posted on your Facebook page about our hop (link to any of the blog hop posts)
* Comment to let us know that you "tweeted" about our hop (link to any of the blog hop posts)
* Comment to let us know that you asked your local store to carry Zva creative products. If they already do, that's fantastic, maybe you can suggest other products that they don't carry.


*Hop over to Zva's facebook page and "like" our page or leave a comment there to tell us that you stopped by if you already like follow us there!

The blog hop begins here at Zva Creative's blog. Your next stop is the wonderful, inspirational 
Natasha Naranjo Aguirre. Enjoy!

Thank you for joining us!

P.S. Mark your calendar to join us again on April 29th for our next Zva blog hop!


Teresa Collins - World Traveler Collection - 12 x 12 Double Sided Paper - Red BrocadeSupplies
ZVA Creative CR-06CA-107 red crystal flourish (used on cover page)
ZVA Creative CRS-06CA-103 Smoke Flourish ( pages 2 and 3,  7 and 8)
ZVA Creative CRS-06CA-102 Jet Crystal Flourish ( pages 5 and 6)
ZVA Creative CRW-03CB-148 Basic Lines Crystal (0.8cm) (cover page, pages 7and 8)
ZVA Creative CRX-05CB-122 Flourish Jet Crystal ( page 10)
ZVA Creative CR-05CA-131 Flickering - Lime /Olive crystal ( page 1 and 2)
Papers:  
Prima Londonderry 6x6 
Teresa Collins World Traveler Collection (Red Brocade used on the cover page)
Graphic 45 Old Curiosity Shopp -Chipboard Pieces (Tags One) and Double Sided Paper - Bazaar of Wonders (pg 3)
Graphic 45 Botanique
Flowers:
Petaloo- Chantilly Velvet& Lace Gold
Petaloo Mixed Blooms Black 
Tim Holtz  Birdcage Die cut
Tim Holtz Walnut ink and Vintage Photo Ink
Stampendous White Pearls Embossing Powder