Monday, February 29, 2016

Embossed Foil Heart Card


Card made from the Grand New Flying Unicorn Kit, Your Passion Your Art, for March

The Flying Unicorns has a whole new look to its monthly kit. It's bigger and grander than ever, combining all the elements from previous add-on kits.    This month the papers include Studio75's Lavender Morning.  I used the papers for the background and paired it with kraft paper from my stash.  

The beautiful details are from Prima's new Adhesive Rub-on set -971304 and accompanying Rub-on-foil 585631 ( Golden Girl) created by Christine Adolph. 

This is just a simple card that is meant to be created in a few minutes and to have fun and play around with the Prima adhesive Rub-ons and new foils.  I loved them.  You can sort of see the golden glow that the foils leave.  At least I tried to capture the essence in my photo.

These heart rub-ons are really beautiful but Prima has a whole collection of gorgeous and unique foils and rub-ons.  I need more.  Too much fun.   You can find them here.   
As you can see, I did make my hearts dimensional.  I rubbed the Prima adhesive hearts onto my Studio 75 papers, then cut them out.  I added a bit of cardboard   to the small heart to give it a bit of lift. 
Make sure to grab your kit soon because they fly away very quickly.  You can grab the goodies here


Products:
Flying Unicorn March Kit of the Month
Studio 75 Lavender Morning Collection 
Kaiser Craft clear stickers Lace Borders
Prima  - Christine Adolph-  Adhesive Rub-on set -971304 
Prima  - Christine Adolph -Rub-on-foil 585631 ( Golden Girl)
Kraft cardstock
raffia
Darice Damask Embossing folder
Distress Ink - Vintage Photo

Flying Unicorns Introduces Its Grand New Kit


http://www.flyingunicornstore.com

Flying Unicorn has heard your requests and granted your wish!

The Flying Unicorn monthly, Your Passion Your Art kit is now bigger than ever - overflowing with all the goodies you desire with all our previous kits rolled into one GRAND collection...
 ONE month, ONE kit.

The Flying Unicorn  now includes papers, an "Off the Page" project, a mixed media collection, and all the coordinated embellishments in one kit, and at one crazy magical price of $59 plus FREE US shipping - or $10 credit toward international shipping. 


Here's what the Creative Team designed


Play along with our Inspiration Board. Post your work to our Facebook Page and be featured!

Flying Unicorn Educators this month sharing free videos, step-by-step tutorials and tips:


Are you visiting the Tallahassee area soon?
Stop in and say hello!
Plan a day trip! Crops -Classes-Fun
926 North Monroe St
Tallahassee, Florida
Tel: 850.270.6366 Toll Free 800.231.7119


Saturday, February 27, 2016

Tales of You & Me - By Prima's Frank Garcia


Prima's newest collection by Frank Garcia, Tales of You & Me,  is one of those collections that is a "must have"  - with soft warm colors.  I thought they would be great for my vintage page.  This collection is also one that creates a little panic when you are holding it in your hands.  Panic?  Why Panic?  Well , because the papers are way too gorgeous to cut.  You flip the papers over and over and look at them trying to decide if you have the guts to make that first cut needed to start a project. 
Heck, all paper crafters have had this problem at some point.  

I know that you have tons of courage and some great creative ideas too.  You can do it!  Beautiful paper is meant to be used and shared and adored by many.  The reassuring thing about Frank Garcia is that once you have used up Tales of You & Me, his next collection will be gorgeous as well.  Somehow Frank magically manages to keep on doing that.   And the process goes on and on.  For now, I may have the best solution yet...grab yourself a few sheets - some to cut and some to stash.  This way you can create with peace of mind.  

This is what I created.  It's a layout of my parents as kids - I decided to edit the photos a bit for color.  

Here is my creative process:

Step 1.  As we previously "discussed", cutting and ripping are hard BUT has to be done.  Great news - you only need one side and you can set the other piece aside for another project, card or tag.  


Step 2. I grabbed one of Prima's Doily 6x6 stencils and added some stenciling to my page.  I love using Finnabair's Art Basics Heavy Gesso because it stays white and bright when dry.  


Step 3. This next process has three parts to it.  Lightly mist the ripped edges with water.  Gently roll the paper with your finger tips.  Dry the paper with your heat gun.  I think this particular step of drying the paper is important because the paper becomes a little stiffer and will stay curled after it has been dampened and dried. 


Step 4.  I wanted to create layers of rolled edges  so I ripped some additional paper for layers and will glue them all to the page.  Follow the same instructions in Step 3.


Step 5.  Heat Dry these paper strips as well. 


Step 6. Glue the paper layers to the page.  


Step 7.  Add some paper doily diecuts using Prima's wonderful new Embroidery Doily die. 


Step 8. I add my photos to Prima's Resin Frame by Ingvild Bolme - Baroque Frame. Then I used a 4x6 Journaling card from "Tales of You & Me" collection as a mat backing. 

Step  9. Add the photo frame to the page and start embellishing with flowers.  I used Prima Tales of You & Me - Flowers #586263. 

Step 10.  Prima's Memory Hardware by Frank Garcia in Grand Rosette Trim makes great custom rosette embellishments on a page.  Add some Prima Color Bloom mists and customize the color to match anything.  I used Color Bloom in Tea Stain and Cotton Candy.  
Step 11.  Tuck the custom rosettes into the flower cluster and add some floral berries from Frank Garcia's Victorian Christmas collection called "Red Stocking". 
Step 12. The wood embellishments and SIIC from the "Tales of You & Me" are totally adorable.  I added these to the side of my page.  
Step 13. It's time to finish up my floral clusters and make them more lush and thick.  I punched some pines and now need to customize the color.  I misted with Lime Wedge and Tea Stain Color Blooms.  I also dried with my heat gun. 

Step 14. Tuck the greens here and there. 

Step 15. Add a finishing bow. 

  Here are some close ups of the finished page.  


Thanks for stopping here.  Enjoy Frank Garcia's collections! You can find the Tales of You & Me collection right here.  You can find Frank's other collections here as well and all the other fun Prima goodies at the Flying Unicorns Store


Products:
583798 Prima Tales of You & Me - Wood Embellishments
990992 Prima Tales of You & Me - 4x6 Journal Cards
584818 Prima Tales of You & Me - SIIC
586263 Prima Tales of You & Me - Flowers
573850 Prima Color Blooms - Lime Wedge
573737 Prima Color Blooms - Cotton Candy - this works as well
573836 Prima Color Blooms - Tea Stain
990466 Prima Memory Hardware by Frank Garcia - Grand Rosette Trim
583477 Prima Victorian Christmas by Frank Garcia - Red Stocking Flowers
584009 Prima Die - Embroidery Doily
961442 Prima Heavy Gesso White
892098 Prima Resin Frame by Ingvild Bolme - Baroque Frame
Prima Stencil


Other:
Gingham Ribbon
cream cardstock
Martha Stewart Branch Punch
Gold Braiding Trim
Ribbon:

Tuesday, February 23, 2016

Bunny Home Decor


Prima's collection,  "Tales of You & Me", created by Frank Garcia, is one of those collections that is totally sensational and a "must have" for your stash.   ( You can see the original post for my bunny at Prima's blog, right here)

I made this sweet little  patchwork bunny with Easter in mind.  It will look great on the table with some flowers.  

I shared my instructions and some photos of the process which you'll find  if you scroll down.  This bunny is remarkably easy to make.  This is a simple process, but I cannot lie - a messy one.  First though, here are a few more close ups.   


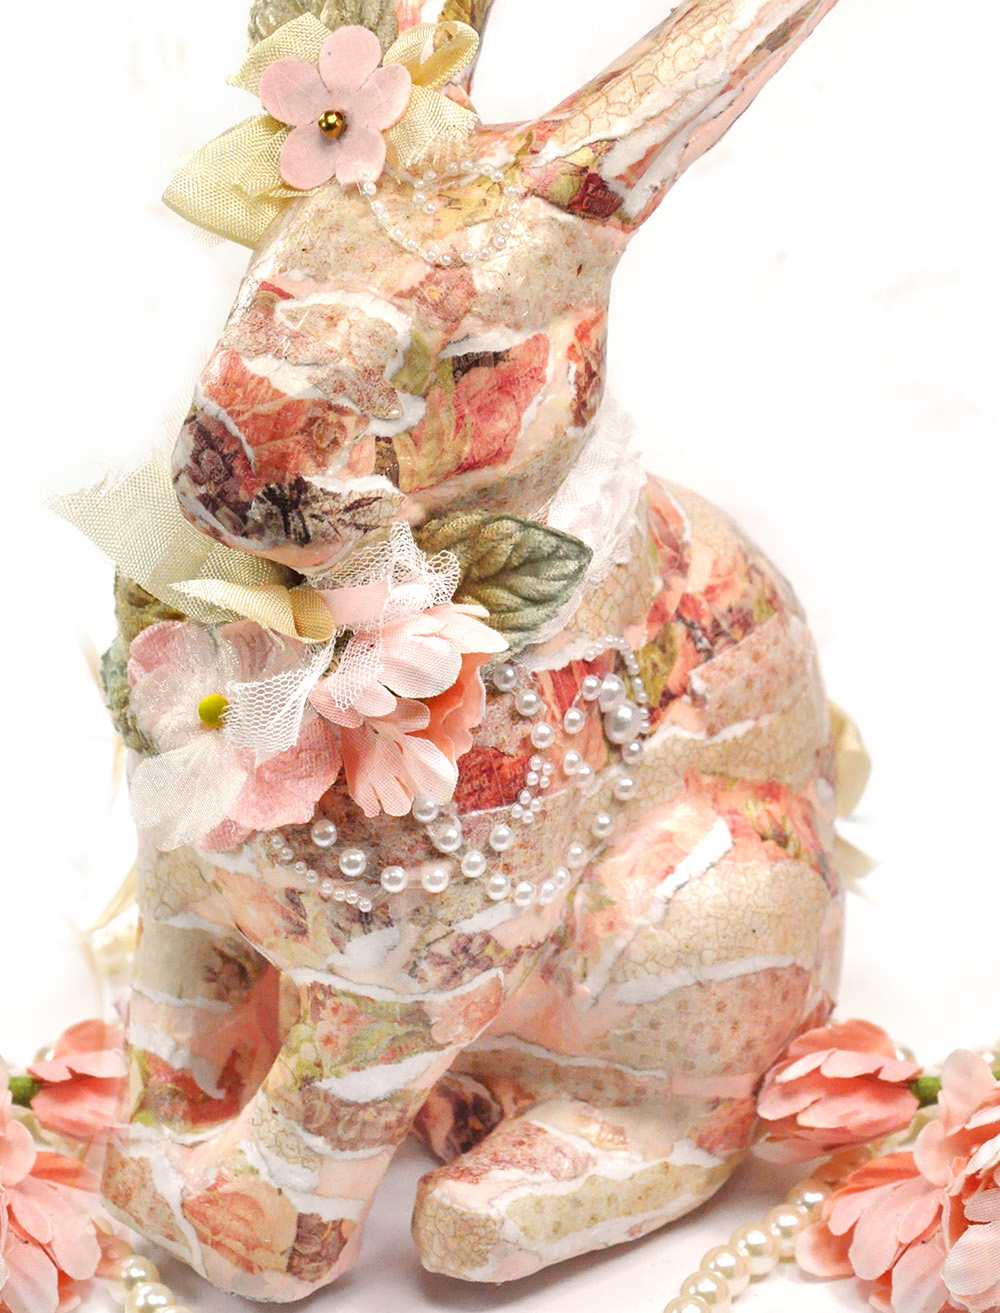
Here is a head shot.  You can see his sweet little face.  To be honest,  it looks like he has an eye and a darker nose.  Totally unintentional.  It's really where the papers ended up but they do look perfectly placed.  I promise I'm NOT that detail oriented. 
I used the Memory Hardware by Frank Garcia - Petite Rosette Trim for the bunny's neck.  It's tiny and delicate and just what an Easter Bunny would wear.  
Here is his side profile. 

...and his darling puff bunny tail  made by using Memory Hardware by Frank Garcia - Grand Rosette Trim.

How did I make this?  

This is the plain paper mache bunny that I started with.  
I painted the paper mache with some gesso.  I used Heavy White gesso  and added a bit of water to thin it out.  After I painted it,  I mixed some Prima Chalk Board paints together to make a blush pink color.  

I did this because I wanted to create the patchwork bunny.  I knew there would be some bare uncovered spots and I didn't want gesso to show.  I thought the blush pink would be prettier as a base color and would blend with the papers better. 

I ripped a bunch of thin strips from the "Tales of You & Me" collection.  I kept  them very small. As I started the project, I noticed that big wide pieces of paper would not form nicely around the  paper mache and lie flat.  

The key to this project is to mist the papers with water and get them wet enough to bend - yet not dripping.  The paper needs to be flexible in order to drape smoothly over the bunny shape.  

 The second step is to coat each paper strip with  Finnabair's Art Basic Soft Matte Gel Medium.  Using matte  medium is important to me because I'm not a glossy gal.  I do not want my final project to shine.  I want it to be a nice subtle table decoration.    The Matte Gel Medium acts as a glue and securely adheres the papers as long as you coat each piece of paper with gel.  

Pay special attention to the ears and the direction you want your paper pieces to set.  I wanted my ears to be long  so I made sure my paper strips were adhered  length wise.

 Working in small sections one piece of paper at a time:

  • cover little spots on the bunny with Soft Matte Gel
  • add a small piece of paper
  • Cover the paper with soft matte gel

Yes I did this with my finger tips, though the foam brush works well.  I just get into a zone and forget the foam brush is sitting next to me.  But this is exactly why I say this project is messy!  Far less messy with the foam brush I imagine...though I guess I wouldn't know.  

 After the bunny is covered with strips and gel, let dry before you start top embellish.  The paper rips and tears easily when wet - so it's better to be safe. 
See how easy?  Embellishing is left up to your wonderful imagination.  

Thanks so much for stopping. 


Products:
990824 Prima Tales of You & Me paper - Belles Melodies d Amour
990817 Prima Tales of You & Me paper - Contes de Toi et Moi
529338 Prima SIIC
990466 Prima Memory Hardware by Frank Garcia - Grand Rosette Trim
961428 Prima Finnabair Art Basics -Soft Matte Gel.
990459 Prima Memory Hardware by Frank Garcia - Petite Rosette Trim
564452 Prima Flowers - Lyric
575311 Prima Flowers - Something Blue
580667 Prima Flowers -Butterfly - Bette

Other:
Ribbon